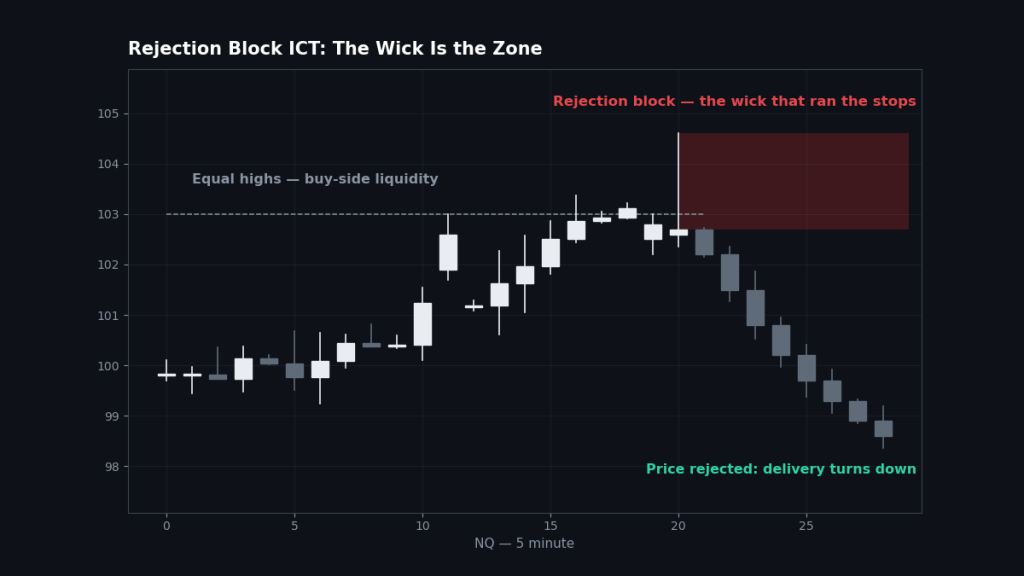
A rejection block in ICT is the wick of a single candle that violently rejected a price level — almost always a wick that ran a liquidity pool and snapped back, leaving a long tail and a small body. The block is the wick itself: the span from the edge of the candle’s body out to the wick’s extreme, and it marks the exact prices where the algorithm grabbed the stops and refused to trade further. A liquidity void is the opposite kind of footprint — not a rejection, but an absence: a stretch of chart where price delivered so one-sidedly that almost no two-way trade happened there, leaving a gap in value that price tends to return and fill. One concept marks where price was refused; the other marks where price never really stopped. Both are PD arrays, and both earn their place on an NQ chart.
What is a rejection block?
Watch a clean liquidity raid frame by frame. Price grinds up to equal highs that everyone can see. Then one candle spikes through them — fast, obvious, emotional — and just as fast, it is gone: the candle closes back below the highs with most of its range hanging above its body as a long upper wick. Breakout buyers chased the spike. Shorts’ stops fired above the highs. And the algorithm, having filled the orders it came for, rejected every price inside that wick.
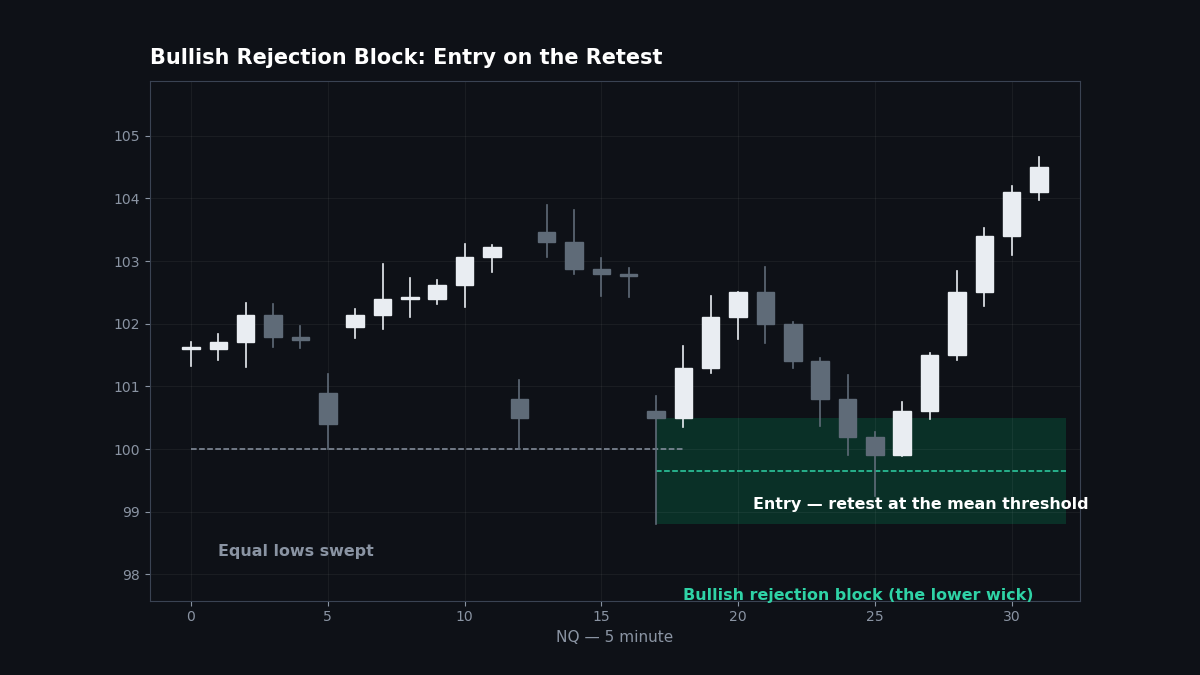
The rejection block is drawn on that wick. ICT measures it from the open/close of the body — whichever edge faces the wick — out to the wick’s extreme. Some traders shade the full candle for context, but the working zone is the wick portion, and within it the mean threshold (the wick’s 50% level) works the same way it does in an order block: reactions that hold above it are strong; closes deep through it weaken the read. A bearish rejection block (long upper wick, formed at highs) is a resistance zone. A bullish rejection block (long lower wick, formed at lows after a sweep down) is a support zone.
What separates a rejection block from any random long-wicked candle:
- It raids something. The wick must take a visible pool — equal highs or lows, an old high or low, a session extreme. A long wick in the middle of nowhere rejected nothing in particular.
- The rejection is the story of the candle. The wick should dominate the candle’s range — the longer and cleaner the tail relative to the body, the stronger the rejection being marked.
- It forms where rejection makes sense. At premium for a bearish block, discount for a bullish one, against the level the whole market was watching. Location grades this block like every other array in premium and discount.
What is a liquidity void?
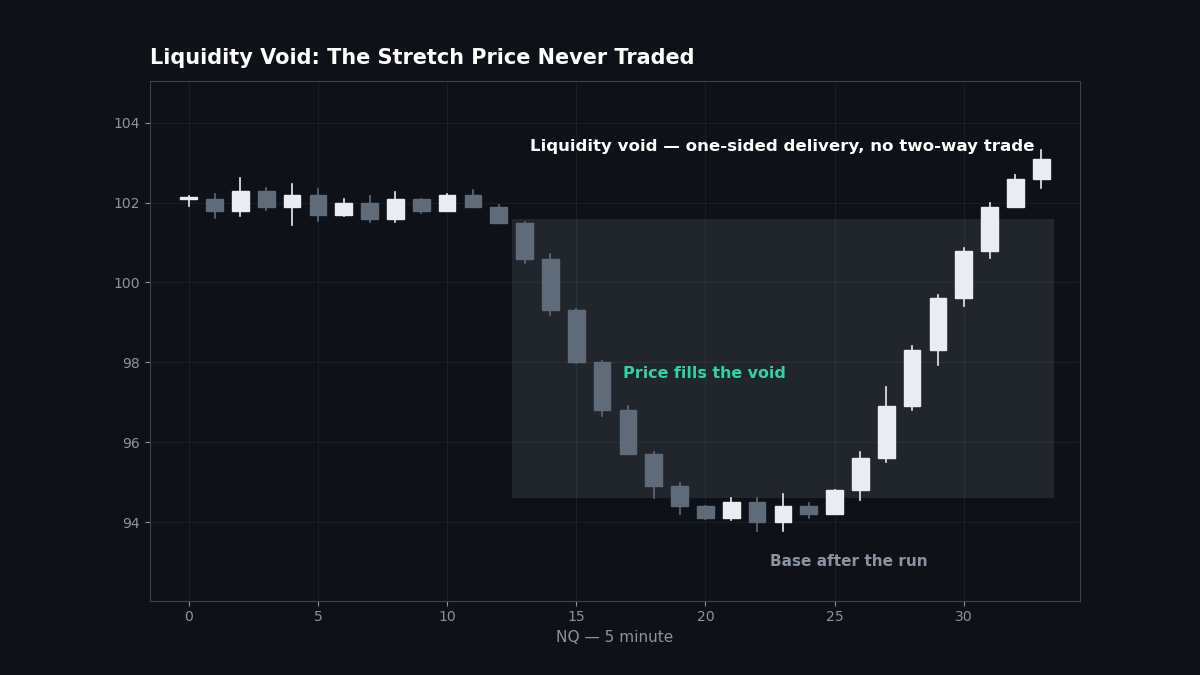
A liquidity void is a region where price delivered in one direction so efficiently that it barely traded on the way through. On the chart it looks like a near-vertical run: a sequence of large same-direction candles with little or no overlap between them — bodies stacked on bodies, wicks barely touching, no pauses, no balance. Where a normal move builds value candle by candle, the void is a stretch the algorithm skipped over. There was, functionally, no liquidity offered inside it — hence the name: a void where two-sided trade should have been.
Do not confuse the void with its smaller cousin, the fair value gap. A fair value gap is a precise, tick-measurable three-candle imbalance — one gap, exact edges. A liquidity void is the broader footprint of the same disease: a whole run of inefficient delivery, often many candles long, with no single clean gap to measure. If the FVG is a pothole, the void is a washed-out stretch of road.
Why voids matter is the fill. Price tends to return into a void and re-trade it — and when it does, it usually travels through the entire void quickly, because there are no established levels inside it to slow the trip: no blocks, no balance, nothing that ever proved itself as value. ICT traders therefore use voids two ways: as a magnet (an objective price is drawn toward, alongside the pools from the liquidity guide) and as a warning (do not expect support or resistance to appear mid-void; if price enters it, expect the far side).
How do you identify rejection blocks and liquidity voids?
For a rejection block:
- Find the raid. Identify the pool that was run — equal highs, the overnight extreme, yesterday’s high or low.
- Find the candle that did it. One candle (occasionally two) whose wick extends well beyond the pool and closes back inside the prior range. The body should be small relative to the wick.
- Draw the wick zone. From the body’s edge to the wick extreme. Mark the wick’s mean threshold. Extend the zone forward until price closes decisively through it.
For a liquidity void:
- Look for the vertical run. A sequence of aggressive candles in one direction with little overlap — price covering ground at several times its normal pace.
- Bound the void honestly. The void spans from where orderly two-way trade broke down to where it resumed — usually the last balanced candle before the run to the first balanced candle after it.
- Leave it on the chart. Unlike a gap, a void has no clean fill percentage to track. It is either substantially re-traded or it is not; when price re-enters, expect the full traverse and grade any reaction at the void’s edges, not inside it.
How do you trade them on NQ?
Rejection blocks trade as retest zones, like their block-family relatives. The raid and rejection print in real time; the entry comes later, when price returns to the wick zone and confirms. For a bearish rejection block at the highs: wait for price to rally back into the wick, refine inside the zone with a lower-timeframe shift or a small fair value gap, short with the stop beyond the wick’s extreme — the raid high is the honest invalidation, and it is usually tight. Target the sell-side pool below: the rejection told you the algorithm was done with the upside; the draw says where it works next.
Liquidity voids trade as expectations, not entries. You do not buy “the void.” You use it to set objectives and to avoid mistakes: if price is below a large unfilled void with buy-side liquidity resting above it, the void is part of the route price will likely take — fast. If your short’s target sits on the far side of a void, expect price to slice through it without pausing for your partials. And if price is chopping at a void’s edge with no displacement, there is no trade at all — the void tells you how price will move when it moves, not when.
A concrete NQ morning using both: overnight, price runs up in a near-vertical squeeze from the 5:00 p.m. ET futures open, leaving a clear liquidity void on the 15-minute chart between the evening base and the pre-market top. At 9:30 the cash open spikes the pre-market high — buy-side swept — and prints a 5-minute candle with a huge upper wick: a bearish rejection block in premium. The short plan writes itself: retest of the wick zone for entry, stop above the raid, first target the sell-side below — and the void underneath as the fast lane price will likely traverse on the way down. Two footprints, one from refusal and one from absence, both pointing the same way.
Common mistakes
- Drawing rejection blocks on every long wick. A wick that did not raid a pool is just volatility. The rejection that matters is the one that grabbed visible stops and closed back inside — no raid, no block.
- Using the whole candle as the zone. Stretching the block from wick tip to the body’s far edge inflates the zone until it explains everything and predicts nothing. The wick is the block; the body is context.
- Expecting support inside a liquidity void. The defining feature of a void is that nothing was established inside it. Marking a mid-void “level” because price paused there for one candle intraday repeats the exact error the concept exists to prevent — when price re-enters, trade the edges or the traverse, never the middle.
- Confusing a void with a fair value gap. Different footprints, different handling. A gap has exact edges and a consequent encroachment you can plan an entry around. A void is a broad inefficiency you use for objectives and expectations. Journal them separately or your notes will blur both into mush.
- Trading the rejection candle itself. The spike that prints the block is the most emotional candle of the move — chasing it means entering at the raid’s extreme with the retest still coming. Like every block in this family, the money is in the return trip, confirmed.
FAQ
What is a rejection block in ICT?
The wick of a candle that raided a liquidity pool and was violently rejected — drawn from the body’s edge to the wick’s extreme. A long upper wick at highs forms a bearish rejection block (resistance); a long lower wick at lows forms a bullish one (support).
How is a rejection block different from an order block?
An order block is the last opposing body before a displacement — a candle-range zone. A rejection block is a single candle’s wick after a raid — the footprint of refusal at a level, rather than the footprint of accumulation before a launch. They often sit at the same swing and grade each other.
What is a liquidity void in ICT?
A stretch of price where delivery was so one-sided that almost no two-way trade occurred — a near-vertical run of stacked candles with little overlap. Price tends to return and re-trade voids, usually traversing the full void quickly when it does.
Is a liquidity void the same as a fair value gap?
No. A fair value gap is a precise three-candle imbalance with exact edges and a measurable midpoint. A liquidity void is a broader region of inefficient delivery across many candles. The gap is an entry zone; the void is an expectation — a magnet and a fast lane.
How do you trade a liquidity void?
Mostly by respecting it: as a likely route and objective for price, and as a no-trade zone for counter-trend ideas inside it. Entries are planned at the void’s edges, in line with structure and the draw, not in the empty middle.
What invalidates a rejection block?
A decisive close through the wick’s extreme — price accepting beyond the raid point. At that moment the “rejection” has been overrun, the zone’s logic is dead, and the level goes back to being ordinary liquidity waiting to be swept.
Where to go next
Rejection blocks complete the block family that starts with the ICT order block and continues through breaker and mitigation blocks — read them as one set. The void’s small, precise cousin is the ICT fair value gap. The full map, as always, is in the ICT section hub.