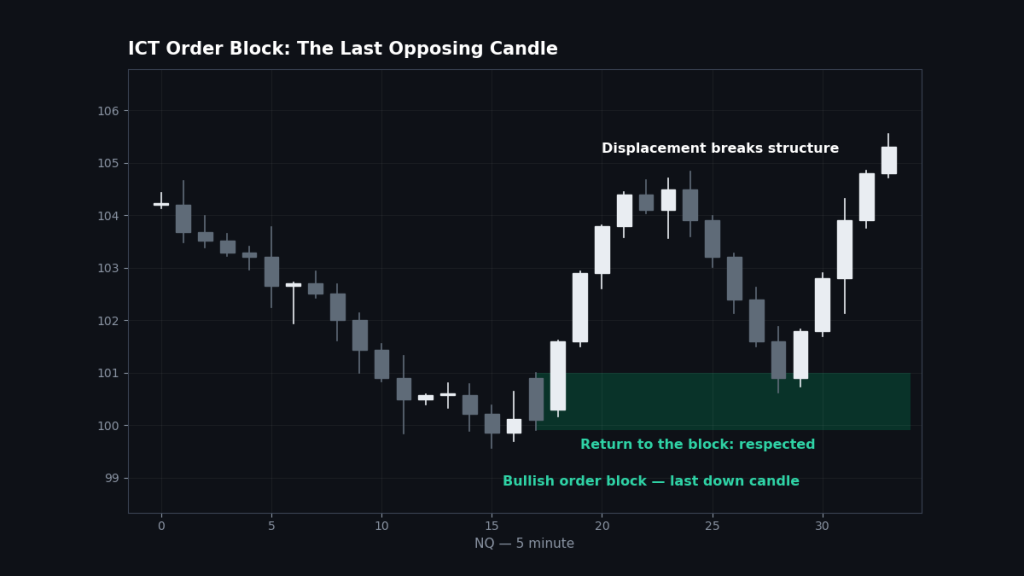
An ICT order block is the last opposing candle — or short series of candles — immediately before a displacement move that breaks market structure. Before a bullish displacement, it is the final down candle; before a bearish displacement, the final up candle. ICT treats that candle’s full range, from its high to its low, as the footprint of the institutional order that launched the move: the place where the big position was built. When price later returns to that zone, the position is defended, refined or added to — which is why order blocks so often act as precise support and resistance. Every strong move on an NQ chart starts at an order block; the skill is telling the real ones from the thousands of ordinary candles that are not.
What is an ICT order block?
Start with what an order block is not. It is not any down candle in an uptrend, and it is not a zone you draw because price bounced there once. An order block earns its name from what happens after it prints. A down candle sits quietly at a low. Then the next candles explode upward — displacement: wide-range bodies, a break of the nearest swing high, and a fair value gap left behind in the rush. That combination retroactively certifies the quiet down candle as the order block. Without the displacement and the structure break, a down candle is just a down candle.
The logic behind the zone is an order-flow story. A large buyer cannot fill a position in one print without moving price against themselves, so the position is accumulated while price is still moving the other way — into the opposing candle, where sellers are providing the liquidity. When the buying is done, price launches. The candle where the accumulation finished is the block, and its price range is where that institution’s business was done. On a return trip, unfinished business often remains: orders to defend, orders to add, and break-even exits from anyone who got filled there and held. That is the engine under the retest bounce.
Two zones inside the block matter:
- The full block: the candle’s high to its low. This is the drawn zone — the area you expect a reaction inside.
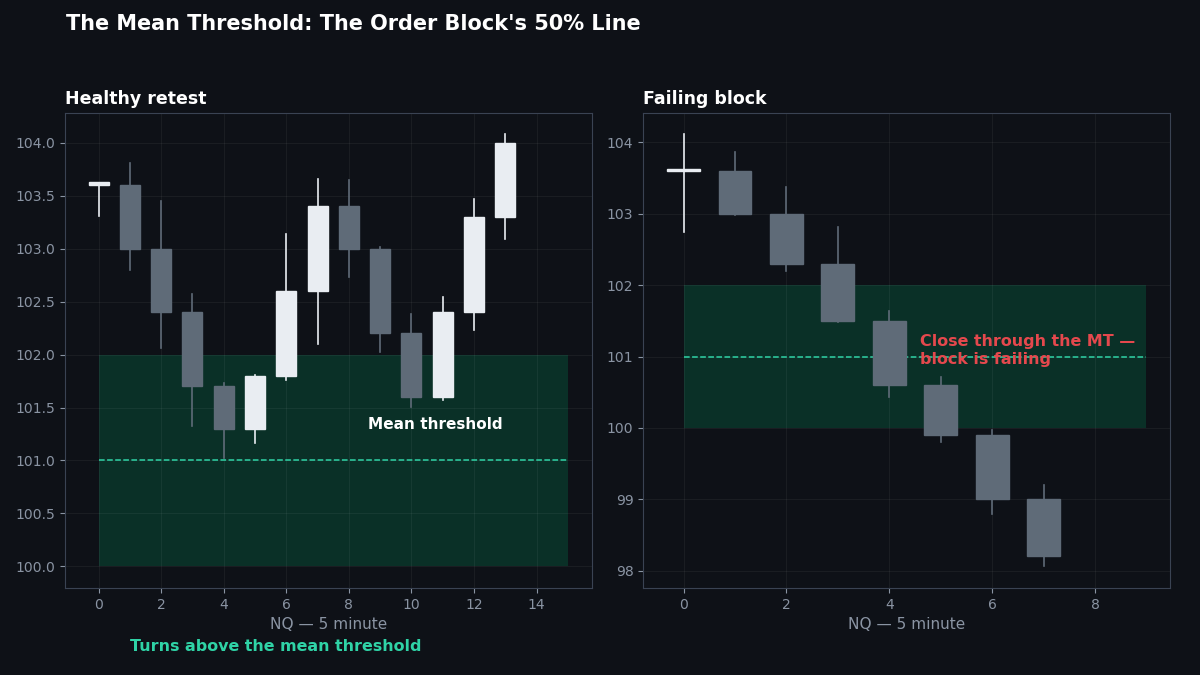
- The mean threshold: the 50% midpoint of the block, covered in its own section below. The mean threshold is where the block is truly judged: healthy retests turn at or above it (for a bullish block); deep closes through it are the block failing in slow motion.
How do you identify a valid order block?
Most candles fail this checklist. Run every candidate through it, in order:
- Displacement follows it. The candles immediately after the candidate must move aggressively — large bodies relative to the recent range, closing away from the block. No displacement, no block.
- Structure breaks. The displacement must take out a swing — a break of structure in the new direction, or better, the market structure shift after a liquidity raid. A strong push that breaks nothing is a push into a wall, not a launch.
- A fair value gap appears. The displacement should leave an imbalance in its wake (see the fair value gap guide). The gap is the receipt that delivery was one-sided and fast — the order block and the gap usually arrive as a pair, and the pair grades each other.
- Location is correct. A bullish order block belongs in discount of its dealing range, ideally after sell-side liquidity has been swept. A bearish block belongs in premium after buy-side is taken. A textbook block in the wrong half of the range is a trap — premium and discount outranks candle shapes.
- It sits at the origin. The block is the last opposing candle before the launch — the base of the displacement leg, not a random opposing candle halfway up it. If price has already returned to the zone once and used it, treat it as spent or weakened, not fresh.
Bullish and bearish order blocks
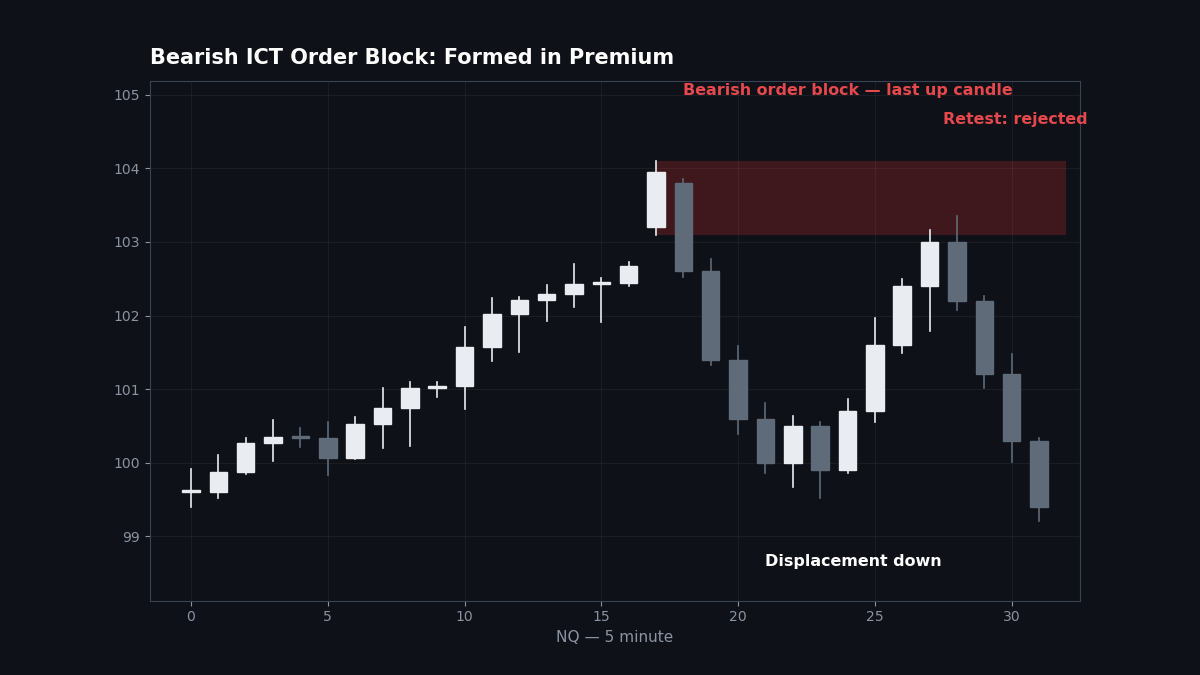
The mechanics are mirror images. A bullish order block is the last down candle (or compact series of down candles) before an upward displacement that breaks structure — it marks support, and longs are planned on the return to it. A bearish order block is the last up candle before a downward displacement — it marks resistance, and shorts are planned on the return. When a block is formed by two or three small opposing candles trading as one base, draw the zone across the whole base rather than cherry-picking one candle; institutions do not respect your favourite candle, they respect the price area where the business happened.
What is the mean threshold of an order block?
The mean threshold is the 50% level of the order block’s range — the midpoint between its high and its low. It is ICT’s built-in quality gauge, and it does three jobs.
First, it is the refined entry. Entering at the block’s edge means your stop must survive the whole block; entering at the mean threshold tightens the trade and matches where the bulk of the institutional order is read to sit. Second, it is the validation line. On a retest, price probing the outer half of a bullish block and rejecting is healthy. Price closing through the mean threshold — and especially trading deep into the lower half — says the defence is not showing up, and the block is failing. Third, it is the failure gauge for position management: an entry at the edge that sees price close through the mean threshold against it has used up its benefit of the doubt; that is the moment to cut rather than hope for the far edge to save you.
Think of the block as a house with a load-bearing wall at its middle. Price can wander the front rooms freely. Once it is living in the back half, the structure of the idea is compromised.
How do you trade order blocks on NQ?
The block is an entry zone inside a sequence, never a standalone signal. The working method:
- Start from the map. Bias from market structure, draw from liquidity: which pool is price working toward, and has the opposing pool been swept to launch the move?
- Let the block form. After the sweep, displacement breaks structure and certifies the origin candle as the block. Draw it, mark the mean threshold, note the fair value gap that came with it.
- Enter on the return. Price retraces into the block — often through the gap first, the two zones overlapping. Entry anywhere from the near edge to the mean threshold, scaled to your risk; stop beyond the block’s far extreme.
- Target the draw. The pool on the other side — the equal highs, the old high, the overnight extreme the move was always aimed at. The block got you in at the origin; liquidity tells you where the delivery ends.
- Obey the mean threshold. A close through it against the position ends the idea. A block that fails loudly is not a loss to argue with — it is next week’s lesson on breaker blocks, because a failed block becomes someone else’s entry zone.
A concrete NQ morning: the New York open raids the overnight low at 9:35 a.m. ET, and the reversal launches with displacement — a market structure shift, a fair value gap, and at its base, one compact down candle: the bullish order block, sitting in discount of the overnight range. At 10:10 price retraces into the block, taps just past its mean threshold, and turns. The long targets the overnight high — the buy-side pool that was the draw all along. Block, gap, discount, pool: four concepts, one trade.
Common mistakes
- Labelling every opposing candle an order block. If displacement did not follow it and structure did not break, it is a candle, not a block. The certification is in what price does next — no exceptions.
- Entering the retest blind, with no shift. A block formed on the higher timeframe still needs lower-timeframe confirmation for most traders: wait for price to react inside the zone — a small shift, a gap, displacement away — rather than catching the first touch with a limit order and a prayer.
- Ignoring the mean threshold. Entering at the edge, watching price close through the midpoint, and still holding “because the block hasn’t fully failed” is how a defined-risk trade becomes an undefined one. The threshold is the line; treat it like one.
- Trading blocks against the draw. A beautiful bearish block in premium means nothing if the draw on liquidity is the pool above it and structure is bullish. The market will run through your block to get its orders — location and direction outrank pattern.
- Reusing spent blocks. A block that has already been retested and reacted has done its job. Each return trip weakens it. The third tap is not “a stronger level”; it is a level on its last legs.
- Drawing the block too tight. Using only the candle body, or only one candle of an obvious multi-candle base, shrinks the zone smaller than the orders that made it. Draw the full range of the base; refine entries with the mean threshold, not with a smaller box.
FAQ
What is an order block in ICT?
The last opposing candle (or compact base of candles) before a displacement move that breaks market structure. Its full high-to-low range marks the zone where the institutional order behind the move was built, and price often reacts when it returns there.
What is the mean threshold of an order block?
The 50% midpoint of the block’s range. It serves as the refined entry level, the validation line for retests — closes through it signal a failing block — and the invalidation gauge for trades taken at the block’s edge.
How can you tell a real order block from a random candle?
By what follows it: aggressive displacement, a break of market structure, and usually a fair value gap left in the displacement. A candidate candle with none of those after it is not an order block, no matter where it sits.
Where should an order block be located to be valid?
In the correct half of its dealing range — bullish blocks in discount, bearish blocks in premium — ideally formed at the origin of the move right after the opposing liquidity pool was swept.
Does price have to respect the whole block, or just the mean threshold?
Expect the reaction to begin anywhere from the near edge to the mean threshold. A close through the mean threshold against the block’s direction is the warning that it is failing; a full close through the far edge ends it.
Which timeframe order blocks matter most on NQ?
The ones aligned with your bias timeframe — usually the 15-minute and 1-hour blocks for the day’s direction, refined by 5-minute and 1-minute blocks for entry. A lower-timeframe block against a higher-timeframe block loses, almost every time.
Where to go next
The order block’s partner in every displacement is the ICT fair value gap — learn to read the pair together. When a block fails, it does not disappear: it becomes a breaker or mitigation block, and those flips are a page of their own. The full map is in the ICT section hub, resting on the foundations of market structure and liquidity.